Humble Garden

ReSkilling for future food independence

Archive for the ‘planting’ Category

Ye olde soil blocker

Posted by Nika On February - 16 - 2009

Manna Contest shots: 100mm

I just thought I would share a few shots of some of the things we are doing around here. Its all really low key and a lot of planning and dreaming – not too scintillating :-)

I bought a soil blocker doodad from Johnny’s seeds and have been using it to make seed starts indoors.

small soil blocker

small soil blocker

small soil blocker

You pack the form with starting soil and then plop it down in trays like below. I will be the first to say these are the not the most beautiful soil blocks!

soil blocks

I let KD (6 yo and headstrong) help with some of the seeding, here you can see that she put quite a few basil seeds into a tiny bit of soil!

Sprouts gone bad

Sprouts gone bad

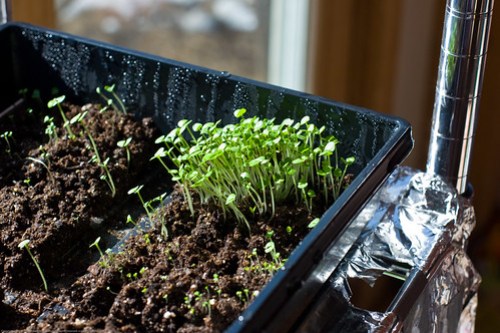
I have also been growing mesclun indoors simply for the green and to eat long before the beds thaw enough for planting :-)

Mesclun sprouts

Fantastic Fennel Pollen

Posted by Nika On June - 30 - 2007

(Italian porchetta with fennel pollen, on creamy polenta)

Last weekend, while at the Les Dames d’Escoffier – BostonFeast in the Field” event, I had the opportunity to eat something I have NEVER eaten before – Fennel Pollen. It was encased in a heavenly roll of roasted sustainably grown pork belly. I didn’t realize it was there (wasn’t expecting it) but when I took a bite it blossomed in my mouth – bang!

I need to taste it again before I can really describe it in detail. I can say that it was fennel amplified.

This ingredient is VERY expensive and hard to get (need to order it, can’t get it at a local store) but I realized that this MIGHT be a crop which I can grow and market.

To this end, I dedicated one of our unheated raised beds to intensive cultivation of fennel (and I am thinking about expanding this to other areas around our house and potentially, if I can get a system down, some leased land).

This unheated bed is not two feet high like our main garden and fennel seeds are a bit tricky to sow (they are sickle shaped and do not roll out of my hand neatly). For this reason, I wanted to make it easier to plant these guys.

I found this site that describes making your own seed tape. Other sites suggest using newspapers and flour paste, etc etc. That is good if you are going to store it, which I am not, I wanted to plant right away.

Use toilet paper – ours is single ply scott.

Essentially, you use a length of toilet paper (mine was 8 feet long) , a spray bottle with water, and your seed.

Spray the toilet paper and then lay the seed down in the center, at distances that you want to grow the plant. In my case it was in the middle of each square. I know this is tight for normal planting but we will see what happens. Everything else I am growing it planted a bit tighter than is suggested.

Spray a bit more and then fold over one edge and then the other to form a triple ply strip. Spray again and gently pat down the strip.

I rolled each strip onto a small plastic pot that a plant came in. You cant really carry the wet toilet paper around, rolling it up is better.

I then rolled the strips out on the soil. I adjusted them to a desired spacing.

Then I covered the strips with the recommended amount of soil and then watered.

I will let you know how this goes!

7 beds, all in a row

Posted by Nika On June - 15 - 2007

Oh my goodness! Ed and crew are FINALLY done with the seven raised beds (with internal radiant heating system). You can see them in the photo above.

Now we turn to the chicken house. I will share that process as it comes along.

I am also now going to start seeding the three brand new beds.

I have brainstormed on the placement of the first aquaculture tank and I will share some of that planning as soon as I have it mocked up in a document.

Amphibious visitors

Posted by Nika On June - 12 - 2007

Bufo a. americanus

Our raised beds must be getting rave reviews in the “Riparian Times” because a whole host of toads have been moving into the neighborhood. Ours look to be of the Eastern American toad (Bufo a. americanus) flavor. We all know that these guys eat insects so we are mighty happy to host them.

We finally got our asparagus bed built.

I am using a modified “Square Foot Gardening” planting plan where, instead of the 4/square foot they do, I am doing one crown per square foot on top of compost and topsoil (with some organic bone meal to modify the phosphate levels).

Here is a shot of the tomato patch from the end.

Here is an update shot on one of the seeded beds.

Here are some plants ready and waiting for the 8×8 bed. Notice that we have some sweet potatoes in there. I am not convinced that these will like it here but we will find out!

The Way Forward

Posted by Nika On June - 11 - 2007

As I mentioned in a previous post, I am mapping out where and how each seed is planted in the beds. This may seem to be overwrought but I do not think so. The reason I am doing this is so that I can know what each seedling is as it grows so that I can watch it’s morphology change, be alert to the different types of insect predators, see which seeds do not like this soil, see which are thriving, which like being next to the other, etc. I think it is worth the time to know what I have planted, where and when so that this sort of analysis is easier.

I am also planting in the vein of “Square Foot Gardening” (though with some pretty big differences) by Mel Bartholomew which means that I am planting intensively. I am also seeding in companion crops to bolster the health of the micro-ecosystems I am creating.

The four maps below are for the beds we have completed and seeded. I have also put a link to the flickr page for each if you would like to look at the images closer up. There are two more 8×16 beds and then a 8×8 bed. We are also finishing off the 4×8 bed for the asparagus (companion planted with tomatoes? perhaps though I am still thinking about it)

Bed 2

Flickr link

Bed 3

Flickr link

Bed 4

Flickr link

Bed 5

Flickr link

More to come!

Related Posts:

Enter the Flea Beetle

Posted by Nika On June - 7 - 2007

See that little black speck to the right of center? That little guy is eating little holes in some of my tomatoes and also in some of the other seedlings.

I looked on the internet and have found that it is called a Flea Beetle. When you go to pick them off the leaf you have to be careful because they will jump away like a flea. They are very easy to kill tho, very unlike a flea.

Since this is an organic garden, I want to deal with this problem with no chemicals.

The internet says to:

  • Use covers (not an option because these guys likely came with the dirt)
  • Use a trap crop like radishes
  • Use a pesticide
  • Use onion or garlic or pepper spray

Its this last one that I will be trying today. I am going to get some garlic and make a solution of it and then swab it onto my affected plants. I am going to start it off at a relatively (as it seems to me) concentration.

I am also having another issue.

My transplanted pimento peppers (Bonnie from Walmart) are growing some gnarly looking leaves since their transplantation. Is this a fertilizer issue? A too much water issue? A pH issue? If you know, drop me a note!

Ed is working on the fifth bed today, 6th soon and then a large 8×8 herb garden.

We got some Mary Washington asparagus (with a bonus extra pack), 40 in all. Now we are deciding where we will put these guys. As you may know, eating these wont happen until like 3 years from now. They take up a lot of space vertically so they do not want to be IN the garden…

I am still working on the 4th garden in terms of seed placement, almost there. I am also working on seeding in the companion crops to help deal with bugs and get some synergistic benefits.

This guy is growing like a weed but we are not going to weed him.

Four beds rising

Posted by Nika On June - 6 - 2007

Here is the latest panorama. You can see that Ed has finished the 4th bed on the right! I need to plant that one and the ends of the bed furthest to the left.

I have put a small preview of the map template for each bed (below). I measured the pH of various parts of each bed (as well as nutrient content) so I will be adding that to the maps as well. I will share those when I finish them.

Every day I spend time picking weedlets. I use it as a growing zazen practice. Its precious quiet time.

Sometimes I put on my Maya wrap and take Baby Oh out so he can have some freedom from the tyranny of the older middle 3 year old sister.

He loves it. He listens to the birds, he watches me weed, he doesn’t make a sound and has huge eyes, looking at everything.

Here is bit of an update on the most advanced bed.

The mesclun has moved on to it’s secondary leaves and is looking much like mesclun. Its almost time to plant the next batch in the succession.

The radishes have also gotten their secondary leaves. These are the itchy scratchy ones.

Here is the cinnamon basil which has ALREADY gone to flower. I snipped them and have pruned it to make sure its going to get bushy.

Rainy updates

Posted by Nika On June - 1 - 2007

Thankfully, rain and mist has been our weather so our plants are germinating and growing nicely.

Dragon carrots, horizontally.

Seeds of Change basil diversity pack of 6 types of basils.

  • Genovese Basil
  • Greek Basil
  • Cinnamon Basil
  • Lemon Basil
  • Lime Basil
  • Opal Purple Basil

View from the end of one of the beds.

Planting cartography

Posted by Nika On May - 27 - 2007

Planted the second bed yesterday. Here are a few photos of how I set up the bed and the map I make up for myself to set out the plants. These may be seeded a bit tight but we will see. I will be needing to cull some by design.

I hate forgetting what I planted so this year I am mapping it out. Will transfer this to an electronic copy so that, when the paper is lost as it is bound to be, I have a permanent record. I marked off rough 1 foot sections to help me with the planting. I used a 2×4 to make the marks after using a ruler to mark off feet.

Tomatoes, rosemary, some flowers, cant remember what else right now While out watering these two beds I noticed that we have sprouts already!

mesclun lettuce sprouting – Pack says 10-14 days to germination but these little guys are on their third day, good start. Hope you can see them.

Radishes sprouting – planted 5-24, sprouted 5-27 – pack says 3-10 days for germination.. guess they like their new home. The collards are sprouting too. Nothing else besides the fact that Ed is almost done with the third bed and will be starting on the fourth tomorrow. It seems we are going to have six (6) total! We have decided to change the sandbox idea into the “kid’s garden”. We have also set up a screen tent in the backyard (photo coming) so that the kids can play in the shade and a bit less bug.

About Me

We are a family of 5, including Nika, Ed, Q (14), KD (7), and Baby Oh (4). We garden 1024 square feet of raised beds plus assorted permacultural plantings. We also have 13 LaMancha dairy goats, 40 chickens, and one guard llama.

Twitter

    Photos

    NVIDIA_Overlay_z9BHN9bhGaFB_IMG_1737353445932sjh_-21b36fc3d57e1ada9318e9b66d89dd7f5