Humble Garden

ReSkilling for future food independence

Noodling over nest boxes

Posted by Nika On September - 30 - 20074 COMMENTS

The chicklings have arrived and they are growing like crazy. We have them set up in a large enclosure in an upstairs bedroom (that is naturally hot these days) with a heat lamp. Things are getting interesting because they are NOT ready to go outside but the little guys are getting a bit feisty and are deciding to fly on occasion, not a good thing inside one’s house.

Garden Project: chicklings upstairs at home

The little chicks are growing proper feathers now.

Garden Project: older chicklings - feathers

Ed has done a whole lot on the chicken house and its time for me to put in the nest boxes.

Garden Project: chicken house with double walls

Garden Project: making the door

I am working on a set of 5 boxes to start, with room to make more, that will have roll out bottoms that feed to little ramps in the back that then feed to a hole that is accessible from the outside of the house. This way I do not have to open the house to get inside to get eggs and let out a ton of heat in the middle of winter (when its -20 F around here).

I think I am going to use some of the roofing plastic material for the egg ramps in the back. It wont come together for me until I am actually putting the thing together because I am not certain how much of an angle is best to get the eggs to roll but not too fast.

This is rather academic in some ways because the chickies are MONTHS from egg laying. I just want to get the boxes built before we put the little things in the house.

We still have to do the run in the back. Once that is done, they should be big enough to be put out with a heat lamp and perhaps some seedling mats to help them transition.

Rembrandt of a swine

Posted by Nika On September - 27 - 2007ADD COMMENTS

Rembrandt hogs

I just wanted to let you all know that I am indeed very much here but that life has been whirlwind as of late (including our first brought-home-from-preschool sickness).

I just wanted to share a couple of images I took this last week while on a project which I will post about more later.

Just wanted to do a shout out to Ingrid and say “You are the best for asking!”

peeky pig

Avian Abode

Posted by Nika On September - 10 - 20075 COMMENTS

chicken house construction

(3/4 view of in-progress chicken house. Front door is rough cut, will be full height)

Tomatoes are coming at us fast and furious, watermelons and squash have met fates which I will write about after this post, sometime soon.

Our attention is turning to the chickens today as I have some photos of the house in progress to share.

What you see above is the house in most of its glory :-/. The front door will be full height and not all topsy turvey like that. Notice the roof, its made of clear plastic roofing material. I didn’t want to build a cave like house so I requested that.

Here is what the ceiling looks like from inside.

The join between the roof and the walls looks like this.

And this.

Let me just say this – do not ask me WHY things were constructed as they were, its just the way my husband felt they needed to be.

This is a shot of the roof from the outside.

All those openings you saw at the top will be sealed with wire mesh. They will be open in the summer to allow cross breezes and then stopped up with insulation in the winter, as needed.

I requested a little manure sweep-out door at the base of one of the walls so that all we need to do to get rid of manure is to open the flap and push the manure and litter out into a waiting wheelbarrow.

Seen here from the inside.

Seen here from the outside.

Wire mesh lies beneath the flooring to inhibit rodents and also the ferocious Fischer cat weasels that we have indigenous to the surrounding forest.

Here you can see some of the foundation to the chicken house.

There is a huge amount of stones in the foundation into which radiant flooring tubing has been buried. It will serve as a heat sink for the radiant heating system, allowing for very low energy input but good returns on temperature control. Those orange tubes are the radiant floor tubing.

We will be painting the interior to waterproof it (and keep chickens away from the pressure treated wood). We will be building a deck in front of it which will also be covered. We will sit on this deck to enjoy the garden and also, around the side, watch the chickens in their back enclosure, if we feel the need.

I will be building roll-away nest boxes that will feed to a central collection point where I will then have a hole made through the wall so that all I have to do is walk up, open a little door in the wall, and pick out the eggs for the day.

I will shoot that when its done.

All gaps and such will be sealed with the wire mesh. We are determined to not lose our chickens to the fox and weasel which have been so awful in previous years.

We are thinking about setting up a motion detector system inside for nighttime to scare away any predators that may have gotten too close to or into the house. I am thinking of rigging up a speaker system that will emit a lion’s roar should we have a break in.

ROFL

It will be tempting to also put up some sort of cam to be able to watch the girls during the day and capture predators in the act of breaking in and then losing their minds when the roar lets loose. (These are all fun ideas which come WAY after getting the darn thing done in the first place!)

Yeah, we are scarred from predator attacks, can you tell?

Fighting powdery mildew with milk

Posted by Nika On August - 30 - 200719 COMMENTS

Powdery mildew on pumpkin leaves

This is one fast growing crop that I didn’t intend to grow. I think I “bought” this problem of powdery mildew when I did a foliar spray with some fish emulsion that was then followed by multiple damp dark gloomy depressing sunless days.

Within a week, it has really done a number on my vine crops.

It doesn’t really upset me because this represents a teachable moment. My family will not starve due to a reduced number of spaghetti squash and mini-pumpkins and I will, hopefully, learn something about how to cope with powdery mildew.

Lesson #1: Once it starts, its not going away so you have to “deal” with it if you do not want it to spread everywhere.

Lesson #2: It might start in the shade but it will be happy spreading to sunny locations.

While searching for an organic way of dealing with this problem I came across this paper by Crisp, Wicks, Troup, and Scott called “Mode of action of milk and whey of in the control of grapevine powdery mildew” (PDF format) in the journal called Australasian Plant Pathology, published in 2006 (Australasian Plant Pathology, 2006, 35, 487–493).

Powdery mildew takes out all sorts of crops and can be especially vicious to wine grapes. Control of powdery mildew in wine grapes has been done by spraying with sulfur containing fungicides. This is why wines are contaminated with sulfites (and why I can not drink wine, I am violently allergic to these sulfites).

Its been known for some years that spraying a 10% skim milk or whey solution on affected plants is very effective in the treatment of powdery mildew.

This paper reports that sunlight interacts with the milk to form oxygen free radicals that collapse the hyphae of the organism grapevine Erysiphe (Uncinula) necator which we call powdery mildew (zucchini is effected by Sphaerotheca fuliginea). It also damages the conidia (asexual, non-motile spores of a fungus) within 24 hours of treatment.

Some people use hydrogen peroxide, a rich source of oxygen free radicals, but this paper reports that H2O2 doesn’t do anything to the conidia and that it encourages germination of this fungus.

Interesting huh?

Must be that the free radicals produced by photo-oxidation of something in the milk acts by a different mechanism than the free radicals in hydrogen peroxide. Or does it?!

The answer lies in complexity. Read on.

When they looked at a specific component of milk called lactoferrin (a globular multifunctional protein with antimicrobial activity (bacteriocide, fungicideWIKI, an 80 kDa iron-binding glycoprotein, binds to the membranes of various bacteria and fungi, causing damage to membranes and loss of cytoplasmic fluids – paper), a part of the innate defense, conidia were ruptured but hyphae were not effected until 48 hours out.

This indicates, as per these authors and seems intuitive, that milk has a bipartite action against powdery mildew:

  • photo-induced free radical activity
  • lactoferrin mediated rupture of conidia

The authors close by saying that the mechanism by which lactoferrin is effecting the conidia is not clear. They also think that there many be other parts of milk which could be having an anti-mildew effect.

I will be spraying my unfortunate mildew-infested plants with a 10% skim milk solution (shown below) and I will let you know how it goes!

Drop me a comment if you have had success with this method.

Measure a 1:10 milk:water solution into a sprayer. I am using skim now but I might try a whole fat to see if there might be some fat-soluble or fatty acid aspects. I might even use raw if all else fails!

If I were being scientific about this, I would leave a section unssprayed, spray one section each of – skim, whole commercial, whole raw. This is not scientific, its going to be anecdotal and descriptive and with no controls because I started out just desperate to attack the problem so I do not have any untreated plants right now.

As I am not a mycological physiologist and I am not working of a government grant, I think its going to be ok.

Pour in the milk.

Pour in the water, mix it all up in a bucket.

Spray on a SUNNY DAY, not cloudy.

Watch.

Spray twice a week.

Watch.

Blog.

Lets hope I can see SOME result otherwise there will be no follow up to this post and you will be left hanging!

A healthy ecosystem in an unappealing wrapper

Posted by Nika On August - 16 - 20075 COMMENTS

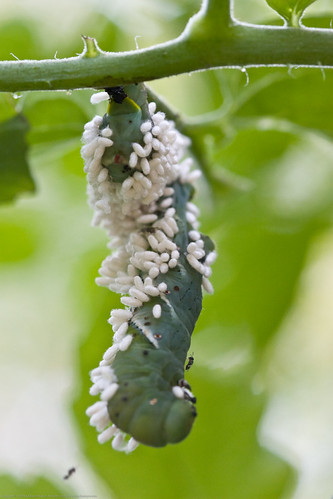
In one of my many-a-day strolls through the garden, I was looking at one of the tomato patches, lamenting the loss of most of the leaves on my calabash tomato to some sort of wilt (I hesitate to says its one thing, I am guessing various things are going on here) and I found, hanging from a tomato branch, this caterpillar beset by eggs and what looked like flying ants.

My first reaction was revulsion (OK, that remains my reaction) but I left it there because:

  1. I could not help myself with wanting to take a shot,
  2. I knew that someone over at the flickr group “ID Please” would be able to help me identify these two creatures (flies and [[caterpillar]]) and
  3. I had a sneaking suspicion that something so revolting must be good some how (just like when I see an antique .. if I find it hideous it is bound to be expensive and in demand … like a reversed fashion compass of sorts)

My friends Mean and Pinchy and aw c’mon at flickr helped my identify this as a [[tomato]] hornworm (Five-Spotted Hawkmoth – Manduca quinquemaculata) being consumed by braconid [[wasp]]s, a VERY good thing. Once these wasps hatch they can go on and [[parasitize]] more hornworms.

From the wiki entry on braconids, relating to their parasitism:

“Most braconids are primary parasitoids (both external and internal) on other insects, especially upon the larval stages of Coleoptera, Diptera, and Lepidoptera, but also some hemimetabolous insects like aphids, Heteroptera or Embiidina. Most species kill their hosts, though some cause the hosts to become sterile and less active. In the case of endoparasitoids, species often display elaborate physiological adaptations to enhance larval survival within host, for example the co-option of [[endosymbiotic]] viruses for compromising host immune defenses. These polydnaviruses are often used by the wasps instead of a venom cocktail. These viruses suppress the immune system and allow the [[parasitoid]] to grow inside the host undetected. The exact function and evolutionary history of these viruses are unknown. It is a little surprising to consider that sequences of polydnavirus genes show the possibility that venom-like proteins are expressed inside the host caterpillar. It appears that through evolutionary history the wasps have so highly modified these viruses that they appear unlike any other known viruses today. Because of this highly modified system of host [[immunosuppression]] it is not surprising that there is a high level of parasitoid-host specificity. It is this specificity that makes Braconids a very powerful and important biological control agent.

Parasitism on adult insects (particularly on Hemiptera and Coleoptera) is also observed. Members of two subfamilies (Mesostoinae and Doryctinae) are known to form galls on plants.”

So these hymenoptera order members are in good in my book. I will just have to look the other way cause they make me nauseous!

Here are a couple shots of a couple of my tomato plants are seem to have a wilt. This first one is a calabash tomato plant with MANY fruits.

The fruits look fine and so many and so heavy that they need to be braced or the branch gets very stressed (see photo)

This is a different tomato (small salad tomatoes)

This also has abundant numbers of small cherry like tomatoes.

I took some new shots of the whole garden today and it seems to become this sort of embarrassing overgrowing crazy green entity! Makes one think of a green version of tribbles.

If you have any ideas of how best to minimize this wilt business next year, I would love to hear it. I plan on planting each tomato far from it’s neighbors and give them abundant space.

I am also definitely going to plant [[tomatillo]]s again (and more, disbursed everywhere) because they bring in the bees like crazy, very good for [[pollination]].

Voluptuous beets

Posted by Nika On August - 14 - 2007ADD COMMENTS


This flash slideshow shows you some of the ways I have used our [[beet]]s lately.We have eaten about half of our first batch of red beets (some of the other beets we have planted include: Shiraz Tall Top Beet, Chioggia Beet, Lutz Salad Leaf Beet, Yellow Mangel Beet). Their greens are starting to look mighty ragged so we will be accelerating our beet-feasts to catch them before they simply go bad in the ground.Various recipes have been or will be blogged at my food blog Nika’s Culinaria.The one dish that has the yellow disk like item (its polenta) was blogged at this post “The unbearable intensity of homegrown food” and it is called “Homegrown organic beets and greens served over beet juice infused [[polenta]], dribbled with a beet, garlic, apricot gastrique“.I think I like the following detail photo especially because it shows the dark voluptuous nature of the beet along with some of it’s delicate inner leaves. These leaves are revealed sometimes when you pull away the much larger ones.

Slightly steamed with a sprinkle of sea salt, beets are such a lovely part of summer.

Organic chickens – by hand

Posted by Nika On August - 8 - 20072 COMMENTS

If you have been reading here a bit, you will remember that we are in the process of building a new chicken house. I have not mentioned this in a while because construction on the house has been delayed. Why? We live not too far from Old Lyme, Connecticut and live in the Lyme Disease Hot Zone and as a result, like everyone else around here, we are awash in deer ticks and the constant lingering menace of Lyme Disease.

My husband, while building the decking between the wood shed and the chicken house, was bitten and came down with lyme disease. Let me assure you, this is not a minor annoyance. Lyme disease, the way he got it put him in the ER several times, bought him a spinal tap and dubious concerns by ER docs of Eastern Equine Encephalitis, West Nile, even Malaria (which his symptoms were mimicking tho they said since he didn’t just come from some stinking steamy malarial swamp – they haven’t seen parts of our land! – that malaria was not likely). It finally took our family doc, who is just awesome, to know as soon as he heard the details that this was lyme disease.

Whew.

Back to the chickens.

Some of the chickens we are thinking of raising include the white silkies which the Chinese love for it’s black meat and traditional medicinal value, MAYBE we can get a hold of some blue feet chickens, some hearty brown and other color layers, and perhaps some cubalayas.

In my previous chicken experience we had meat chickens and I am still traumatized by the experience of killing and butchering them. As a scientist, I have taken down numerous rodents but I never butchered them nor ate them (yikes). I always did it because I had to and I always detached mentally from it. That doesn’t mean I don’t still think about those animals and I certainly appreciate their contribution to my thesis and published works.

To get more experience from people who have done this a lot and who raise organic pasture chickens, I attended the “Chickens for meat and eggs” workshop at the Many Hands Organic Farm.

I have put together a slideshow of some of the photos from the part of the workshop that demonstrated how to kill and then butcher the chickens below.

I share this with the intent of helping to educate. I do not share this to traumatize anyone so if this sort of thing bothers you please do not click through the show.

I also do not share this so that it can be used to traumatize others! I believe in mindful eating and mindful animal husbandry. Its important to know from where and how your meat comes to you.

Farm Beauty

Posted by Nika On August - 4 - 20074 COMMENTS


organic flowers
(Organic flowers)


organic flowers
(More organic flowers)

I just wanted to share some photos I took recently at the Many Hands Organic Farm in Barre, MA. I will talk more later about their fantastic workshop on raising and butchering organic pasture raised chickens.

These are a few shots from around the farm.


drying garlic
(Garlic drying in a chicken house)


A fantastic day
(A fantastic day)


Barn
(Barn and workshop participants)


Tomato cages
(Tomato cages stacked on the roof of a barn)


window
(Contemplative barn window)


(Windrowing attachment for the tractor)


Organic tamworth pig
(Organic tamworth pig)


Organic tamworth pigs
(Organic tamworth pigs)


Organic tamworth pigs
(Organic tamworth pigs)


Organic tamworth pigs
(Organic tamworth pigs)


Organic tamworth pigs
(Organic tamworth pigs)


Pastured chickens
(Pastured chickens)


Moving the pastured chickens to fresh grass
(Moving the pastured chickens to fresh grass)


Pastured layers
(Pastured layers)


wood fired cook stove
(wood fired cook stove with organic chicken soup on top)

Will be sharing more in another post.

Another version of the garden tour

Posted by Nika On July - 30 - 2007ADD COMMENTS

Below is my second try at this video podcast business. I hope it loads for you and that you can hear my voice!

My Podcast Alley feed! {pca-eb5a79734dd79125645e1e5327d2a732}

If this is not working for you, try the YouTube link.

Take a video tour of our Humble Garden

Posted by Nika On July - 27 - 20075 COMMENTS

We, ok, I have spent quite a few hours filming (on my laptop so sorry if its sketchy), editing, configuring and posting our first video podcast!

Commence applause now. (Just kidding!)

Let me know what you think and if you have any problems viewing this.

.
.

If the above video is not loading, try the YouTube video below. If you just see a camera-clock icon, this means that YouTube is still processing it. It should go live very soon.

This is the YouTube version:

About Me

We are a family of 5, including Nika, Ed, Q (14), KD (7), and Baby Oh (4). We garden 1024 square feet of raised beds plus assorted permacultural plantings. We also have 13 LaMancha dairy goats, 40 chickens, and one guard llama.

Twitter

    Photos

    VideoCapture_20250109-160053_3Untitled Flickr photoRobinIMG_9504_DxO