Humble Garden

ReSkilling for future food independence

Cold frames, in the cold rain

Posted by Nika On April - 6 - 200910 COMMENTS

KD with baby goat

(KD with fast growing kid)

.
Wow, lets talk about hardy plants, yikes! I made or rather, I jury rigged, a cold frame on the raised bed that will hold brassicas (early cabbage, kale, and bok choy) to see if I could get them out there before our last hard frost date of May 15th.

I bought some 4 mil clear plastic and 2 ten foot 1.5 inch diameter plastic pipe. We cut the pipes in half to make 4 five foot lengths for support, in theory that is.

Humble Garden 2009: 4 mi plastic for cold frame

This thickness is strong enough to deal with the elements but clear enough to get solar gain.

Humble Garden 2009: 4 mi plastic for cold frame

I stuck the 5 foot length pipes into the bed, as you see below.

Humble Garden 2009: making a cold frame

Humble Garden 2009: KD and cold frame

And then KD, seen above, and I made holes for the seedlings (I peeled off the peat pots when planting)

Humble Garden 2009: transplanting

Humble Garden 2009: all plants transpanted

And then, using duct tape and varying levels of angry kevetching not rated for young ears, I draped the pipes with plastic.

Humble Garden 2009: Completed cold frame

Humble Garden 2009: Cold frames

One important part of this plastic is to keep the darn chickens who are still free ranging off my plants. As I was planting these seedlings, I turned my back for a few moments and the darn rooster jumped right up and ate 5 bok choys!

As soon as I finished enclosing this bean trellis with plastic and stepped back, that evil rooster jumped right up and proceeded to menace my cold frame. He very deliberately worked hard to find a way in.

I hope you can see him in the photo above. I also have a few other shots below.

Humble Garden 2009: rooster trying to get into coldframe

Humble Garden 2009: rooster trying to get into coldframe

After that beautiful day when I built the cold frame, it has been raining and blowing non-stop. Those poor little seedlings have been subjected to sub-32 weather at night and direct weather exposure because the high winds continue to blow everything off the raised beds! This includes having the plastic directly ON the seedlings with a load of icy cold water pooled above them.

I figured I had lost these poor seedlings but today I ran out in the rain and looked and saw that they had already grown new leaves! Crazy things!

I guess they like this sort of weather (I know they are cold hardy but this is just crazy)

I am very thankful for their resilience and I am looking forward to some VERY hardy cabbages, kale, and bok choy!

My next project is broadcasting carrot seed (with sand) and also getting some broccoli going out there.

Frugal seed starting

Posted by Nika On March - 22 - 20095 COMMENTS

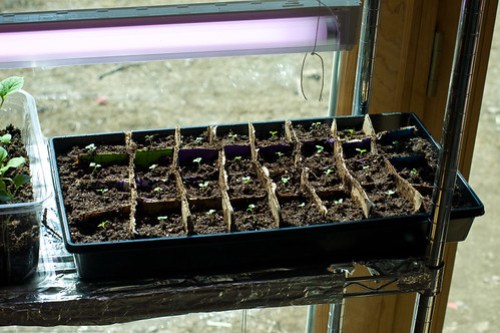
Humble Garden: DIY flat dividers - cabbage starts

Like diapers for babies, it seems like there is no end to the doo-dads and supplies one needs when starting seeds indoors.

My brassica seeds rocketed into sproutdom WAY faster than I imagined they might and I was caught without a means for transplanting the soil blocks to a larger size. I cant really afford to get the larger soil blocker and I didnt have any larger containers right away so I figured I could use an excess diaper box to jury-rig something to transplant the seedlings into.

I was exhausted by the end of this DIY project because I could not find my exacto-knife (DH put it somewhere “safe” and now lost) so I used a pair of KID scissors.. use the knife.

The main hack here is to cut skinny rectangles and then some slots so that they for a grid that fits in the black tray.

Humble Garden: DIY flat dividers - cabbage starts

Add soil.

Humble Garden: DIY flat dividers - cabbage starts

Plant.

Humble Garden: DIY flat dividers - cabbage starts

Humble Garden: DIY flat dividers - cabbage starts

Humble Garden: DIY flat dividers - cabbage starts

White House Victory Garden, Victory!

Posted by Nika On March - 20 - 2009ADD COMMENTS

White House Victory Garden

The White House made a splash yesterday by announcing it’s plans to grow a victory garden on the White House lawn!

Obamas to Plant White House Vegetable Garden” – NYT

If you surf the garden blogosphere you would know that there has been a web based campaign for this very outcome for a couple of years now!

Namely, the Eat the View effort over at the Kitchen Gardeners International site, by Roger Doiron!

Eat the View - Victory!!

Its exciting times and I could NOT be more proud of our first family. This will really be a beautiful beginning to an even more widespread movement to grow your own!

Rye’s newborns!

Posted by Nika On March - 19 - 20091 COMMENT

Kidding 2009: rye babies

So for the past week, we had been watching Rye VERY closely but she seemed to be taking her own sweet time.

Last night my husband had to go to a school board meeting and I was feeding the kids. When he got home he checked on the goats and found that Rye had given birth to two little guys, with no help at all!

She did a fantastic job!

One – who looks just like his dad Flax – is named Flax, Jr. and the other goatlet is called Frederick (I have no real idea why). They are both just too darn cute.

Enjoy the photos!

Kidding 2009: daddy flax

(Daddy Flax)

Kidding 2009: rye babies

Kidding 2009: rye babies

Kidding 2009: rye babies

Kidding 2009: rye babies - Frederick

Kidding 2009: rye babies - Frederick

Kidding 2009: rye babies - Frederick

Kidding 2009: daddy flax

(Daddy Flax)

Flax, Jr. was being shy, will get more shots of him another day!

Birth, renewal, healing

Posted by Nika On March - 16 - 20096 COMMENTS


.
From the last post you learned of our tragedy, losing one of our sweethearts, Wheatie.

Her emergency set the whole herd (8 other goats) on edge. We had just given away one of our two bucks (he was too aggressive and an aggressive horned goat is not a fun thing) so the herd dynamics were already in flux.

The does could tell something was up. One in particular, Millet, seem to miss her friend. She was wandering around and seemed to be looking for something.

Well, this wasn’t so much about missing Wheatie but about Millet being in labor. She was separating herself from the herd (labor sign), getting that 1,000 yard stare (labor sign), and looking restless (labor sign).

My oldest daughter came and got me, saying that Millet was showing the bubble (see this sit for details on goat labor) so I flew out to the goat shed to find Millet scratching at the hay, making a nest (labor sign) and a bubble showing (impending delivery sign).

So I ran around the enclosure to get through the two gates and arrived at the shed just in time to kneel by Millet, smear my hands and arms up to my elbows with betadine solution and get towels arranged as the first kid presented.

A little hoof began to show, then the face (with tiny little tongue sticking out) and then the second hoof – perfect presentation. I tugged on the little hooves as Millet contracted and very soon, the first baby was born. I took the baby into my arms and cleared it’s little tiny mouth (with tiny little teeth!) and tapped it’s sides to help clear the lungs.

I scrubbed the baby to dry and then lay her down next to Millet so that Millet could clean her newborn. Soon, I was doing the same for the second one. It took quite a long time for the placentas to pass but they did with little fanfare on Millet’s part.

Millet Babies - day 2

My oldest daughter named these newborns Calliope and Felicity.

We had another goat who was showing signs but we were not certain. Her name is Amaranth and she is our smallest goat. We figured she only had one baby on board.

After the Wheatie experience, the exhausting experience of wrestling our buck as the vet castrated him and then the kneeling for Millet, my left leg was is paroxysms of pain and cramps for days.

Needless to say, Amaranth was my next challenge. Because of the pain, we moved Amaranth to the basement so that I could tend her in warmth, instead of the mid teens F outside.

We had Ama in the basement with another doe – Rye – to watch them both. Rye was so bothered by Ama that we took Ama back out to the cold shed and I just KNEW that meant she was going to go soon (I think they HATE the basement).

Sure enough in an hour or so, we heard this REALLY loud blood curdling scream that I am sure must have freaked out the neighbors. I run out without a coat to find Ama with a baby already partly out – one leg and a face (and tiny tongue!). The baby was not coming out easily – Ama is such a petite goat.

With her next contraction, I was able to pull the baby into this world. Wow, what a healthy baby! I repeated the post-delivery process and the rest was uneventful.

Amaranth's kid - Luna

This baby was named Luna. She is bigger than Millet’s babies because she was a singleton and wow she is furry.

Obviously, the photo gallery you see at the top of this post shows these three goat babies!

There will be more, no doubt, stay tuned!

RIP Wheatie, our sweet goat girl

Posted by Nika On March - 11 - 200916 COMMENTS

Goats

(Wheatie on the right, the blond one, when she was a baby)

Today we learned just how bad obstetrical emergencies can be.

In the morning, my oldest daughter came running in from the goat shed saying that Wheatie was giving birth. I ran out ready to assist but could see right away, with my untrained eye, that things were desperately amiss.

It looked like a large amount of tissue had come out (was on its way out) but no kid. We called our goat mentor and she came flying over to see that, indeed, this was not normal. The goat was definitely in pain. That pain must have been immense, I feel the most horrible for that.

We were thinking it could be a missed pregnancy and that this was the placenta. That was the best outcome but very wrong.

The vet finally came and he said he had not ever seen this in a goat, once in a sheep and once in a horse.

GRAPHIC WARNING

Essentially, what happened was that the cervix had separated from the vaginal wall. When the vaginal structure prolapsed, it took the abdominal mesentery with it, releasing the now severed uteri with large kids into the abdominal cavity. This is a fatal condition and I am not sure yet what it might be called.

We knew she was in pain. We also knew there was some possibility that kids may still be alive so the vet gave the goat ketamine, removed the kids and our goat mentor and I proceeded to try to resuscitate them. Its possible that the babies passed away some time before, they were completely unresponsive and essentially gone.

We have lost a precious sweethearted goat that we loved as a dear pet.

Now I have to gird the loins or buck up and try to face the other 6 next deliveries. Am crossing my fingers we don’t ever have to go through this again, ever.

Before the vet left I had him castrate the buck. We will have a large enough herd after this kidding season. We love the buck like a pet too. Since the vet was already here, it was not that expensive (we have already spent A LOT of money on vet bills today)

goat shed built today, chicken run finished

(Wheatie, as a baby, with her sister Millet)

Spring is for Labor

Posted by Nika On March - 6 - 20091 COMMENT

Humble Garden 2009: pregnant with 3 or 4

Sure spring is a time for cleaning the garden and mucking out the animal housing but this year, for us, spring is all about obstetrical labor, and most definitely NOT mine.

We bred our 8 dairy LaMancha goats last fall and it looks like 7 of the 8 are expecting. Our wonderful goat mentor came to visit us the other day and felt their furry little selves and she thinks that all but one seem to be carrying and one, that you see above named Millet, may be be carrying 3 or 4 kids.

I know EXACTLY how Millet feels. Soon, though, it will be over and then she will be caring for them for a few days as they get their colostrum and then we start milking her (and bottle feeding the infants).

I will be sharing photos of that craziness in coming days and weeks!

Impatient for green!

Posted by Nika On February - 27 - 20092 COMMENTS

Nasturium Leaves

(Edible nasturtiums, before blossoms. Leaves are fascinating)

February in New England can be a hard month to wade through. Seed ordering and seed packet receiving frenzy is long past. Planning of planting is done. Now its just waiting for time to pass for the moment that indoor started seed can be planted. As of today Friday the 27th of Feb, the most I can plant is some herbs and eggplants that I want pamper well past the flea beetle stage.

At the moment, there is nothing more to start indoors. The snow still sits on the garden, can’t even really clean up because there is too much snow pack.

Crappy Day: miserable garden

Parts of the yard are melting into a dank gooey mess that the duck and chickens love to foul even further.

Crappy Day: cold wet chickens

Having lived here more than a decade (and growing up a good part in the frigid midwest), I knew that planting seeds like a mesclun mix for use long before the sun warms the garden would be crucial.

When I feel especially doldrumish, I hover over my mesclun greens, marvel at their complex beauty, nibble a few to see how they taste and to dream about the green summer to come.

Indoor mesclun

Ye olde soil blocker

Posted by Nika On February - 16 - 20093 COMMENTS

Manna Contest shots: 100mm

I just thought I would share a few shots of some of the things we are doing around here. Its all really low key and a lot of planning and dreaming – not too scintillating :-)

I bought a soil blocker doodad from Johnny’s seeds and have been using it to make seed starts indoors.

small soil blocker

small soil blocker

small soil blocker

You pack the form with starting soil and then plop it down in trays like below. I will be the first to say these are the not the most beautiful soil blocks!

soil blocks

I let KD (6 yo and headstrong) help with some of the seeding, here you can see that she put quite a few basil seeds into a tiny bit of soil!

Sprouts gone bad

Sprouts gone bad

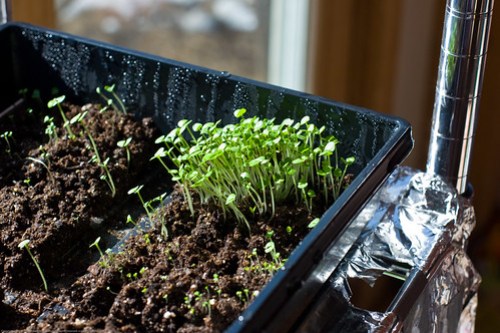
I have also been growing mesclun indoors simply for the green and to eat long before the beds thaw enough for planting :-)

Mesclun sprouts

Radical Photons

Posted by Nika On February - 2 - 2009ADD COMMENTS

(This was cross posted to two of my other blogs Peaknix and Nika’s Culinaria)

HEAT egg

Recently, I came across a solar cooking wiki and a whole group of YouTube videos about how Africans are adopting parabolic solar cookers in their villages. The importance of this didn’t really sink in for me until I saw how women walk hours through elephant infested nature preserves to find wood that they poach unsustainably. They get chased by angry elephants (its THEIR home after all) and the women spend ALL DAY finding dwindling resources, leaving behind unattended or poorly attended babies and small children.

Parabolic solar cooker
source

In particular, there is the Zambian Mfuwe Solar Cooker Project initiated by Manda Chisanga, a guide in South Luangwa National Park who had won a guiding award and decided to spend his prize money on Solar Cookers.

“The documentary covers the installation of five SunFire14 Parabolic Dishes – the project has been expanded to 15 and we are looking at ways to get 500 Parabolic Dishes into the community to cover 6000 families.” source

parabolic cooker
source

With a parabolic solar cooker, all of these risky and ecologically unsustainable practices are stopped immediately. The women can stay with their kids, young girls can go to school instead of watching babies or collecting wood all day themselves.

If that doesn’t sound radical and revolutionary, you are not thinking it through.

You can learn all about the basic principles of solar cooking and see plans for building your own DIY cooker at the Solar Cooking Wiki. Give it a whirl and see what you think.

I have been wanting to make our own DIY solar oven for ages and have finally scraped together some found objects that we have used to make our first winter relevant solar cooker. No cooking is happening yet because I am still testing it and there was no sun to speak of today! We do this in part as a homeschooling project too so the testing is an important part of it.

If you do this, share! Let me hear about how it is going for you.

DIY Solar Oven

DIY Solar Oven

DIY Solar Oven

Found materials and also some high heat enamel spray (which I bought for this project)

DIY Solar Oven: outer box

Cut to fit insulation on bottom of the oven

DIY Solar Oven: interior box

Crafting, with duct tape, the interior box

DIY Solar Oven: box inside box

Need to trim height of the box

DIY Solar Oven: interior box

Trimmed and taped and ready to be sprayed with enamel

DIY Solar Oven:

DIY Solar Oven:

Sprayed, dried, inside larger box, found insulation in place

Next step is to make all manner of reflectors to sculpt the photons into the oven

DIY Solar Oven: for reflectors

Materials for reflectors

DIY Solar Oven:

Two reflectors made. I rigged up a tape slide holder on the backs so that the reflectors are placed without taping them onto the oven part.

DIY Solar Oven: reflector

Slide holder rig

DIY Solar Oven: one reflector

One reflector rigged up

DIY Solar Oven: testing

DIY Solar Oven: testing

Black covered pot and temperature probes

DIY Solar Oven: testing

Solar oven set up inside as we test it out

DIY Solar Oven: testing

Made a third reflector and started testing positioning (which isn’t really intuitive, more experiential)

I know I could buy a solar oven but what fun is that?! Not terribly frugal either :-)

Once we get a good sunny day I will test it properly and share back here!

About Me

We are a family of 5, including Nika, Ed, Q (14), KD (7), and Baby Oh (4). We garden 1024 square feet of raised beds plus assorted permacultural plantings. We also have 13 LaMancha dairy goats, 40 chickens, and one guard llama.

Twitter

    Photos

    VideoCapture_20250107-111125PXL_20250107_162150865Elders Annual Holiday PartyNational Trophy Round 5 V40,V50,V60 Women1759.jpg